
• Light can travel through a stretched canvas, but not a canvas panel (this is most noticeable in situations when the canvas is set up so that the sun is behind it).
I used to buy canvas panels already made from companies like Ray Mar and Source Tek, but I decided that it would be more cost-effective to make my own. I was already buying large rolls of oil-primed linen for my studio paintings anyway. Plus, making the panels myself allows me to make whatever sizes I want. Both Ray Mar and Source Tek make great products (I still purchase other items from them), and it’s definitely more convenient to just buy the panels from them. But with a little extra work it’s pretty easy to make my own.
• Canvas panels are easier to pack and transport than stretched canvases.
• Because of their 1/8″ thickness, canvas panels can be easily transported in a “wet box” to protect finished paintings.
• Painting on canvas panels greatly reduces the risk of cracking later in the life of paintings because the surface is much more stationary than the surface of a stretched canvas and doesn’t move with vibration or changes in temperature.
• Paintings on canvas panels take much less room to store than paintings on stretched canvas (although you can remove paintings on stretched canvas from their stretcher bars and roll them up for more efficient storage).
I used to buy canvas panels already made from companies like Ray Mar and Source Tek, but I decided that it would be more cost-effective to make my own. I was already buying large rolls of oil-primed linen for my studio paintings anyway. Plus, making the panels myself allows me to make whatever sizes I want. Both Ray Mar and Source Tek make great products (I still purchase other items from them), and it’s definitely more convenient to just buy the panels from them. But with a little extra work it’s pretty easy to make my own.
Any type of linen or even cotton canvas can be used to make panels, but I use Claessens #15 double-oil-primed linen (since I paint with oils and prefer the behavior of linen compared to acrylic-primed cotton). The #15 is a tight weave and considered to be a portrait-grade surface. (There are many different weaves of linen — some rougher and some smoother.) I generally buy the 82″ x 6-yard roll of the linen from whichever company is offering it for the lowest price. It has often been cheapest at Jerry’s Artarama, but I always shop around a bit online to find the best deal.
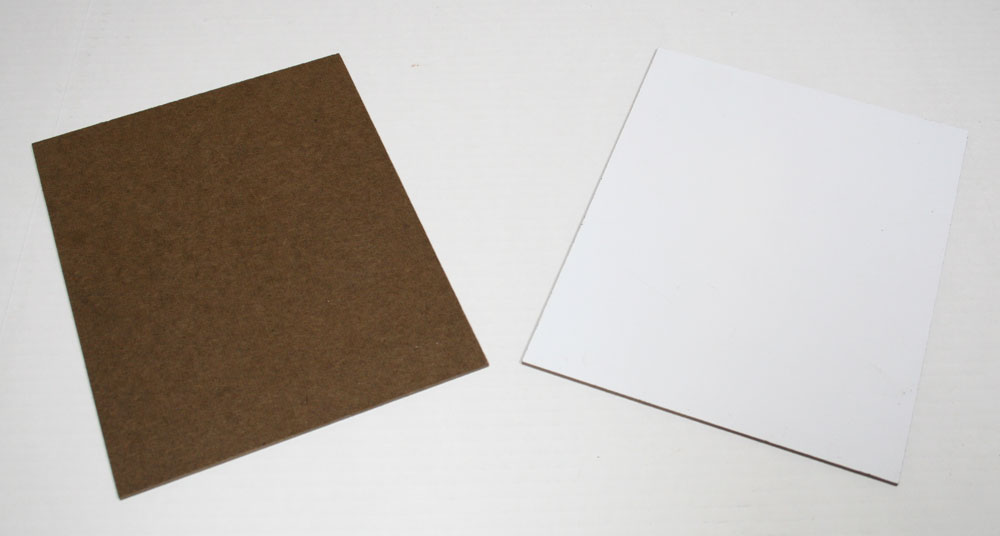
The next item that I use to make my panels is 1/8th-inch hardboard (sometimes called “masonite” or “marker board”) onto which I mount my linen. I currently buy it from Home Depot or Lowe’s and can usually find it in the paneling section (although both stores seem to change the products they carry from time to time). The hardboard is very resistant to warping and is smooth wood on one side and coated with a smooth white surface on the other side. (I like the smooth white surface because it makes a nice clean back for my finished paintings where I can write my title and other information.) I usually buy it in 4-foot by 8-foot sheets, which a friend of mine generously cuts on his table saw to whatever sizes I need. (Home Depot and Lowe’s can cut the panels, but they charge for each cut. Actually, maybe I should figure out how to keep my friend from reading this post….)
(On a side note, I generally make panels for my larger studio paintings as well, but instead of using hardboard I use 3/16″ or 1/2″ Gatorfoam®. It’s easy to cut to any size I need, resistant to warping and lighter than hardboard which makes it cheaper to ship. I glue linen to it just like I do when making panels on hardboard.)
The glue I use to adhere the linen to the hardboard is a product made by Raphael’s called “Miracle Muck.” It creates a strong flexible bond and has a neutral pH when dry. It’s also heat-reactivatable if it ever becomes necessary to remove the linen from the hardboard. I buy it by the gallon from Raphael’s or from Source Tek.
Once I have all the materials and I’m ready to make some panels, I have to gather a few other things. I use a pair of scissors to cut the linen, something to spread the glue with (I just use a small 3″x5″ piece of the hardboard), a rolling pin and something to use as weight on top of the glued panels while they dry (I use a stack of nice hefty art books).
The next step is to cut the linen so that I have a piece for each panel that I want to make. I cut each piece of linen so that it has about 1/4″ extra on each side of the piece of hardboard. For example, an 8″x10″ panel requires an 8-1/2″x10-1/2″ piece of linen (the linen will shrink a bit with the wetness of the glue).
Next I apply the Miracle Muck® to the smooth wood side of the hardboard and spread it around to evenly coat the surface. Then I flip the panel over so that the linen side is up and use a rolling pin to roll out any air bubbles between the hardboard and the linen.
Then I flip the panel over again (so the linen side is down, which will keep any excess glue from dripping off the edges of the panel onto the table) and stack books on top of it to weigh it down as it dries. It usually takes a few hours to dry before it’s ready to trim. Trimming is quite easy and only takes a few cuts with a utility knife to remove the excess linen from the edges of the panel. Then it’s ready for a painting trip! It’s quite convenient to have a stack of panels made and ready to go whenever I have the opportunity to paint outdoors, so I like to keep at least eight or ten panels in various sizes ready at all times.
(An added bonus: A canvas panel can be flung much farther than a stretched canvas when you’re not satisfied with your plein air attempt!)